PRE-CAST Terrazzo Stairs Manufacturing Specification
PRE-CAST TERRAZZO is a cement based conglomerate marble. Marble aggregates of various sizes are carefully selected for compatibility of shade and then subjected to a controlled mix which is then used to produce the pre-cast units. During the manufacture, high frequency vibrations are applied to remove all air pockets thereby ensuring a sound product. Upon casting completion, all products are steam cured for a carefully controlled period and to exacting standards before being transferred to the grinding and cutting factory. At this stage, it is polished and cut to determined size using special quality diamonds saws, to produce tiles, treads, risers, etc. Stair treads and riser produced by this process, being of a uniform material on all sides, like natural marble, can be finished in the same manner. all six sides may be polished, if so required, making this process ideal for stair cases where more than one surface of the treads or risers is exposed. The fixing of the pre-cast terrazzo treads and risers is usually done on suitable sand and cement mortar bedding. However, it can be adapted to suit most fixing details.
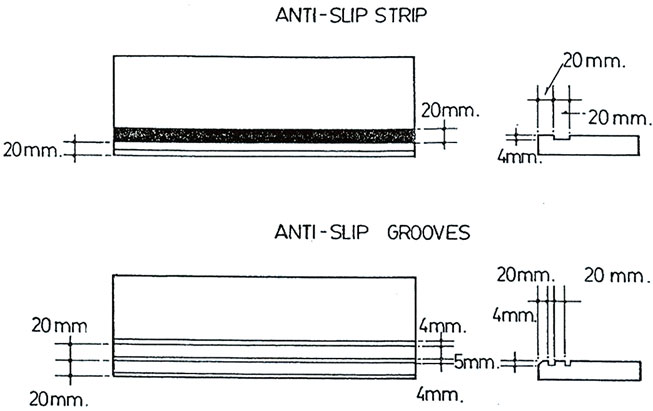
The inlay is a moulded, resin-based, asbestos-free friction material with characteristics similar to brake linings giving an anti-slip foothold. The inlay is slightly flexible and will therefore not break or crack during movements. The anti-Slip insert strips are ideal for both indoor and outdoor use, and have a high coefficient of friction when both dry as well as wet. The insert strips are therefore ideally suited for wherever there is foot traffic. The insert strip will maintain its anti- Slip properties throughout its lifetime, which depending on circumstances and normal wear and tear, the expected lifetime is 10 years based on traffic of 1 million persons per year. The anti-Slip insert strips should be cleaned regularly with soap-less detergent, but should not be polished or cleaned with grease or wax-based cleaning agents as this will reduce the anti-slip properties. The anti-Slip insert strips are available in black and white, and any further information may be obtained from our technical department. This feature incorporates two continuous grooves running the full length of the tread unit, each groove is 4mm wide x 5mm deep and set 20mm apart and 20mm back from the front of the treat nose.
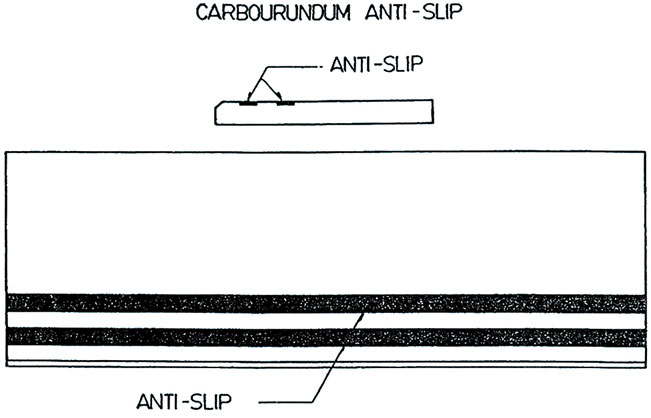
SILICON CARBIDE (SIC) is known as Carborundum and is made by the function of crushed petroleum coke and silica sand in an electrical furnace for 36 hours at 2200°C. Its hardness is 13 Mohs scale. CARBORUNDUM is mixed with resin and fixed in the groove to give anti-slip feature. It has a high coefficient of friction when both dry as well as wet. Therefore, it is ideally suitable for feet traffic. CARBORUNDUM anti-slip should be cleaned with brush only, but should not be grinded and polished.
Method Statement For
Installation Of Precast Terrazzo Tiles (Floors)
- PURPOSE:
Purpose of this method statement is to set guidelines and ensure good working practice for the installation of Precast Terrazzo Tiles (Floor)
- REFERENCES:
- Relevant Project Standard Specifications
- Contract drawings
- Approved Shop Drawings
- SCOPE:
Installation of Terrazzo Tiles Size: 400X400X40 mm in accordance with the specification, BOQ, and contract documents.
- MANAGEMENT JOB DESCRIPTION AT SITE
The Project Manager of ARTIC is responsible for the overall implementation of this Method. He will ensure that the supervisory staffs allocated for the project are aware of this MS and all resources are in Place for the successful completion of the Project. He ensures that work has been done as per the specifications Inspections are done as per the approved ITP the Site Supervisor is responsible to execute the installation as per the approved MS.
- SAMPLES:
ARTIC will initially submit Precast Terrazzo Tiles sample for approval of application, color and finishes. On receipt of written approval, ARTIC will start recruiting the materials and commence with the work.
- DELIVERY, STORAGE AND HANDLING
Inspection before delivery: Finished Terrazzo Tiles shall be finally verified by QCI/Production Supervisor at the factory and released for dispatch.
Packaging and Shipping: Precast terrazzo to be palletized and shrink wrapped, delivered in original unopened packaging with legible manufacturer identification, including size, quantity, manufacturing date and inspector initials. Each Tile pallet will be handled transported in such manner to avoid any damages during transport.
Storage and Protection: Precast terrazzo tiles to be stored indoors, sheltered from moisture in original packaging. Protect from damage by other trades. Pallets should not be stacked on top of each other to avoid breakage of tiles.
- MATERIAL INSPECTION AT SITE:
ARTIC Site Supervisor will check the delivered materials prior to commence with work in accordance with approved Inspection and Testing Plan (ITP) Any non-conformance material shall be rejected in accordance with ARTIC approved procedures, when any rejected materials offloaded due to any supply issue, material shall be segregated and identified to prevent from use until disposal or approving suitable correction action by project manager.
- SITE PREPARATION:
8.1 SITE SURVEY:
- Working area shall be inspected in accompany with Main contractor surveyor to ensure subfloor levels and marking finish floor level prior to hand over to ARTIC Project Manager.
- Inspect surfaces to receive precast and do not proceed with installation of precast terrazzo tile until improper conditions have been corrected.
- Careful evaluation by the installing contractor is necessary for shrinkage cracks in concrete substrate. Technical representatives from crack isolation manufactures may need to be called in to inspect the surfaces and make recommendations before work continues. (Note: several manufactures of thin-set mortars offer products with limited crack bridging capabilities)
- Inspect the defects in existing concrete work that affect proper execution of terrazzo work.
- Any discrepancy beyond the tolerance to be brought to the notice of the Main Contractor.
8.2 SUBFLOOR INSPECTION:
This is the most important step in accomplishing a satisfactory installation. The subfloor must meet the following requirements:
- Structurally sound
- Rigid Smooth and flat
- Free of waxy or oily films
- Concrete surface to be steel troweled with a fine broom finish and free of sealers and curing compounds. Mechanical scarifying will be necessary if sealers or curing compounds are present in the substrate.
- Screed must be cured to a minimum 5.5% moisture content
- The surface to receive terrazzo tile shall be plumb, level and true with square corners. Maximum variation from the required plane shall be 1/8 in 10 feet. Concrete surface to be steel troweled, with a fine broom finish and no curing compounds.
Only after the substrate is carefully inspected and meets all requirements for substrate preparation should the tile layout begin.
- EXECUTION:
9.1 UNDER BED SCREED LAYER:
- Composition: Screed concrete shall by supplied by approved ready-mix supplier in accordance with project specifications.
- Placing: Apply screed with thickness of 25 – 50 mm to uniform levels required.
- Screed under bed to elevation below finished floor elevation to receive the thickness of Terrazzo Tile to be set by the Thin-Set Method
- Screed under bed to 13 mm below finished elevation or slope.
- Screed under bed to a level true plane, pitching to drain where required.
9.2 PLACEMENT OF PRECAST TERRAZZO TILES:
9.2.1 LAYOUT:
Review architects™ drawings for tile pattern, design layout and type of terrazzo tile installation specified. The standard installation type is a Tile Set Installation using our Chamfered Edge Polished, Honed or Brushed finish tile set with a 1/8 minimum grout joint.
Care must be taken in setting up the terrazzo tile layout including checking overall dimensions of the area to be tiled.
Check and square all areas to determine which walls and perimeters are not correct. Review layout options to compensate for any areas out of square.
Install control joints above control joints in subfloor.
Install divider strips as shown on drawings.
When the layout is complete snap chalk lines on the key lines. Set up your grid pattern based on the tile and joint size.
9.2.2 SETTING OF TERRAZZO TILES:
During material handling of the terrazzo tile always bring the pallets as close as possible to the area where the tile are being set. The tile should be inspected as they are being pulled from the pallets prior to being given to the setters for installation. The inspected and blended tile can be stacked on a cart, face-to-face and back-to-back.
Thoroughly saturate concrete substrate with water, slush and broom with neat cement slurry (do not saturate concrete substrate with water if an epoxy bonding agent is used).
9.2.3 Apply bonding agent – Synthetic bonding agent (acrylic or epoxy) may be considered.
Place the Terrazzo mixture in panels to top of strips.
Layout should be designed to avoid terrazzo tile smaller than half size.
Precast units shall be set on under bed. Apply Self-Leveling Underlayment to concrete floors where determined by Architect in conjunction with the terrazzo tile contractor. Leveling coat shall be compatible with setting mortar.
Set the terrazzo tile by placing one edge of the tile as close as possible to the grid line and drop the tile onto the setting bed. Press the terrazzo tile into the mortar firmly while sliding the tile back and forth in a perpendicular direction to the combed mortar.
Carefully feel all adjacent edges of tile, maintaining less than 1/32 lip page. If any low edges are found the tile must be removed and a small amount of mortar added to the back of the tile or the setting bed and the tile reset. The setter should have a small pail of fresh thin set and a margin or pointed trowel to make minor adjustments. These adjustments will prevent lip page and give the terrazzo tile installation a better overall appearance.
Use 1/4 x 3/8 U notched trowel for 1/2 thick tile or 1/4 x 1/2 U notched trowel for 5/8 and 7/8 thick tile.
Press terrazzo tile into mortar bed while sliding tile back and forth in a perpendicular direction to combed mortar to achieve minimum coverage of 95%. Tile should be pulled periodically to inspect for thin set coverage. The corners of the terrazzo tile must have good coverage to prevent cracking.
Roll and compact surface until all excess cement and water has been extracted.
All units to be installed level, square, parallel, except where otherwise indicated in a true plane with adjacent units and other floor finishes.
Trowel to a uniform surface disclosing lines of divider strips.
Joints shall be raked to the depth of at least 19 mm and shall be pointed with a grout matching the color of the matrix.
Follow the Projects™ technical specifications for overall structural expansion joints and divider strips.
Final installation shall be level and true to grade projecting edges and corner.
- CURING:
After completing placement of terrazzo and composition has sufficiently set, cover with water, wet sand or polyethylene sheeting.
Cure until topping develops sufficient strength to prevent lifting or pulling of terrazzo chips during grinding.
- FINISHING:
11.1 ROUGH GRINDING:
Grind with 24 or finer grit stones or with comparable diamond plates.
Follow initial grind with 80 or finer grit stones.
11.2 GROUTING:
Immediately following rough grinding, Surfaces shall be carefully and completely cleaned with sufficient clean water to remove dust and fines. Rinse thoroughly with cleaner. Remove excess rinse water and apply paste consistency Portland cement grout of type employed in the topping by hand or machine with pigment added in like amounts where called for in matrix. Take care to fill all voids.
11.3 CURING GROUT:
As soon as the grout has obtained initial set, cover the entire surface with the specified curing material. Allow to remain indefinitely to protect finishes until final polishing.
11.4 FINE STONING (POLISHING):
Final machine grinding shall not take place sooner than three days following the grouting. The grouting shall be removed by means of floor machines using No.80 or finer grit stones. Upon completion of the final grinding, the terrazzo finish shall show an average of not less than 70-75% of marble chips.
All finished surfaces to be ground and polished, free of holes and to have overall uniformity in matrix and aggregate.
11.5 CLEANING AND SEALING:
Wash all surfaces with a neutral cleaner.
The liquid cleaner selected must be neutral with a pH factor between 7.0 and 10.0.
The cleaner must also be free from any harmful alkali, acid, etc. that might damage the floor.
Rinse with clean water and allow surface to dry.
Apply sealer in accordance with manufacturer’s™ directions.
Interior floor penetrating sealer shall be colorless, slip and stain resistance which will not affect color and physical properties of terrazzo surface.
11.6 SHINING:
The site should be shined after all this by using oxalic acid.
- PROTECTION OF TERRAZZO FLOORING:
The protection of terrazzo and granite flooring on the site is advisable the following precautions should be taken. The finished and partly finished flooring should be protected from damage or contamination from following traded.
During the laying and grinding operations, the area being treated should be accessible only to the flooring operatives.
The completed terrazzo work should not be subjected to traffic until protection has been provided.
The terrazzo should be kept clean and free from cement and plaster droppings and all materials likely to cause stains.
The particular care should be taken with substances that could cause permanent staining, e.g.; oils, grease and paint.
The sheeting boards should be laid over the finished work to protect it; sawdust should not be used for this purpose.
Protect terrazzo from damage and wear during construction operation
- TERRAZZO FLOORING MAINTENANCE:
The terrazzo Floors can usually be cleaned effectively by washing or scrubbing with warm water and a neutral sulphate-free detergent suitable for cleaning terrazzo.
Greasy deposits can be removed by detergent incorporating an organic solvent.
The occasionally use of mild abrasive cleaners can be beneficial in removing stubborn marks, but household soaps are not recommended as they tend to leave a slippery scum, particularly in hand-water areas.
The regular use of scrub and rinse cleaning machines fitted with abrasive pads other than the finest grades, or the use of machines with hard plastics bristles could result in damage to the surface of terrazzo.
The damage could also be caused by frequent use of unsuitable cleaning agents, including highly acidic or alkaline detergents and chemicals.
Resistance to staining can be increased by the use of certain proprietary chemical hardeners and sealing enhance the appearance of the terrazzo, but care should be taken to ensure that sealers have been manufactured for use on terrazzo.
The wrong type of treatment can cause floors to become slippery; the wax polished and linseed oil should never be used.
The soaps containing water soluble, inorganic salts or crystallizing salts should never be used in the maintenance of terrazzo; some terrazzo floors have been damages by improper selection of cleaning materials.
- INSPECTION AND TESTING OF TERRAZZO FLOORING:
14.1 INSPECTION:
The work should be inspected during progress and after completion. Special attention being paid to the following:
The materials are as specified.
The preparation of the under bed layer.
The surface texture and finish.
Levels and surface regularity.
14.2 TESTS:
The test specimens can be taken during manufacturing process or from the delivered quantity may be carried out for the followings tests in accordance with relative standards:
- The flexural strength
- The compressive strength
- Total water absorption
- The absorption by face
- The abrasion resistance
Cleaning & Maintenance
MAINTENANCE OF TERRAZZO AS IN CP202 (SECTION 5)
CP 202 TILE FLOORING AND SLAB FLOORING
General:
Surface contamination apart from normal usage (or obvious misuse) contamination can arise from: (1) Efflorescence; (2) Residual cement film; (3) The use of unsuitable surface sealing materials; (4) The use of unsuitable cleaning agents
Efflorescence:
Efflorescence is a white deposit which may develop on the floor surface as drying out proceeds. It is due to the crystallization on the tile or slab surface of soluble salts caused by moisture from the bedding or sub-floor. It is aggravated by excessively damp conditions following installation or prolonged delaying drying out. The deposit disappears with washing with clean water but may reappear after drying. Efflorescence diminishes with progressive washing and the most effective treatment is to increases the frequency of washing until the deposit ceases. Persistent efflorescence may arise from rising moisture where inadequate damp-resisting construction has been carried out.
Residual Cement Film:
During the first few months after laying, some tiles may exhibit a scum which is insoluble in water. This generally arises from Portland cement and can be removed only by treatment with appropriate acids or an abrasive according to the type of tile or slab. Such treatment may, if wrongly applied, because further damage and should only be carried out after adequate consultation with the contractor and if necessary the manufacturer of the floor finish.
Surface Sealing Materials:
Except for special situation (see 5.2.3.) surface sealing is not necessary and in not recommended. Excessive application or use of an unsuitable material can cause a patchy appearance of the floor surface particularly outside the main traffic areas which may not be removable by normal washing or scouring. In this event, the advice of the manufacturer of sealing materials and possibly that of the floor finish manufacturer should be obtained to decide the most suitable method of recovery.
Cleaning Agents:
With the exception of terrazzo tiles all floor finishes covered by this code are effectively cleaned by normal washing or scrubbing with warm water and a neutral sulphate-free detergent. Whichever cleaning aid is employed it is essential to ensure that it is completely removed by final rinsing with clean water. When selecting a cleaning aid care must be taken to avoid the possibility of the risk of damage to adjacent fixtures and wall finishes.
All Floor Surfaces:
The use of unsuitable cleaning agents on floors may lead to the salt contamination of adjacent walls and cause consequential damage to stone, paint and plaster.
Particular floor finishes:
Clay Tiles and Bricks:
All these forms of flooring require little maintenance and are easily kept clean by sweeping and then washing with warm water to which soap less detergent has been added, they are not however damaged by the occasional use of scouring powder block or bleach to remove particularly stubborn blemishes. Household soaps are not recommended as they tend to leave a slippery scum, particularly in areas of hard water. The application of linseed oil or polishes is not recommended since they are not absorbed into the surface and tend to make the tiles slippery and more difficult to clean.
Concrete Tiles and Cast Stone:
Brushing and washing is all that is normally required to keep these floors clean.
Terrazzo tiles:
Good condition, scrubbing with soap and water is recommended, care being taken to remove soap residue. Although terrazzo tiling has a high resistance to oil staining, it is not completely impervious to oil penetration; however, there are certain proprietary treatments available for the removal of oil stains. Resistance to staining can be increased by the use of certain sealants. The manufacturer’s advice should be sought on proprietary treatments and sealers. It should be recognized that disinfectants with phenol or cresol-base will stain the tilling. Fine abrasive powders may occasionally be used to remove stubborn marks, but are not recommended for regular maintenance.
Natural Stone (sandstone, limestone):
Natural stone floors require little maintenance. They should be cleaned with water, aided as and where necessary by an appropriate grade of neutral, sulphate-free pumice powder or a neutral, sulphate-free pumice powder or a neutral, sulphate-free detergent. Soda, soda-ash, and alkaline or sulphate-containing cleaning agents or scouring powders should not be used.
Natural Stone (granite, marble, slate and quartzite):
Generally, through cleaning with water is all that is necessary to remove face dirt. Neutral sulphate-free detergent may be used if required and then thoroughly rinsed- off with clean water to prevent the flooring becoming slippery. Soda, soda-ash and alkaline or sulphate-containing cleaning agents or scouring powders should not be used.
Maintenance Instruction:
Damage can occur to a floor finish by misuse or incorrect maintenance, because of inadequate instruction initially. Personnel responsible for maintenance must be given full information concerning any particular risks of misuse likely to occur including recommendations for cleaning.
MAINTENANCE OF TERRAZZO AS IN BS 4131: 1973 (APPENDIX)
BS 4131: SPECIFICATIONS FOR TERRAZZO TILES
Recommendations for maintaining terrazzo tiling.
After the floor has been laid and machine finished if specified, it should be covered with white non-staining sawdust to protect it while other work is being done. When the sawdust is eventually removed, the floor should be thoroughly scrubbed. Wall tiling should be scrubbed at the same time the water should be changed for every 10 sq. area of tiling scrubbed.
E.2. Wax polishes should not be applied to wall tiles until the tiling is clean and has thoroughly dried out. Their use on floors tends to make the terrazzo slippery and should generally be discouraged.
Although terrazzo tiling has a high resistance to all staining, it is not completely impervious to oil penetration. It should be noted however, that certain proprietary treatment are available for the removal of oil stains.
Disinfectants with a phenol or cresol base will stain the tiling. The resistance of terrazzo tiling to staining may be increased by the use of certain sealers. E.5. The manufacturers advice should be sought on proprietary treatments and sealers.
Scrubbing with soap and water is recommended for maintaining terrazzo tiling. Soap should be removed carefully afterwards.
Detergents should not be used owing to the difficulty of distinguishing between neutral products and those containing constituents harmful to terrazzo. E.8. Fine abrasive powders, although not recommended for regular maintenance, may be used occasionally to remove stubborn marks .
MAINTENANCE OF TERRAZZO AS IN CP 204 PART 2: 1970 (SUB SECTION 3F)
CP 204: PART 2 1970 IN-SITU FLOORINGS
- General:
Under normal conditions, at terrazzo floor finish may be cleaned by washing periodically with water and occasionally using fine abrasive powder. After cleaning with powder, the floor should be thoroughly washed down and dried. soap should not be used. The application of wax in any form is not recommended as the resulting surface will be slippery. Disinfectants, particularly those containing phenols and cresols may react chemically with traces of iron compounds in the cement to produce a pink discoloration in the floor finish. Sometimes, it is not possible to remove this color even by regrinding the surface.